For those with a little bit of knowledge in demolition, it will be easy for them to through the process. But for those with no background or experience, demolishing a house may seem a daunting task. Fortunately, we’re here to give you a step by step guide on demolishing a house.
- Know Which Method is Right for You
There are a couple of ways you can do to tear your house down to ground. So, first and foremost, you need to know which one to do. Have a look at some of the options you have.
Deconstruction Of Your Phoenix Home
This method is slowly gaining recognition with homeowners as it is a ‘green’ process and can save you some money in materials. It is done by manually dismantling your home piece by piece with the intent of saving as much materials you can that can be recycled or reused. Commonly salvageable materials include doors, windows, lumber, shelves, etc. According to the EPA, you can recycle about 70% of buildings materials. Neat, right?
However, since your house is taken down piece by piece, it will take a lot longer to accomplish than by straight up demolishing it. The cost will also be higher- around twice or thrice that of demolition- since additional labor is imminent.
Deconstruction with Demolition
With the development of deconstruction, innovators have combined this with demolition to come up with a method that is more efficient, affordable, and environment friendly than plain deconstruction. The first thing done here, is dismantling a portion of the salvageable materials. Once this is done, the rest of your home is demolished.
Mechanical demolition of your Phoenix House
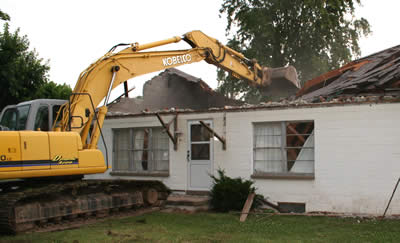
If you want to keep things fast and simple, go old school on your house. The most common method, this procedure uses heavy equipment to tear down your house straight up. The debris that was your house will be hauled away after. Simple as that. This is the fastest and cheapest method as well. this can cost from $4,000.00 to $14,000.00 depending on the size of the house.
- Get the Right Contractor
Demolition contractors should be able to give you an insurance certificate addressed in your name. If they cannot provide with one, it means they are probably not insured. Meet them at your house to be demolished, and they will discuss every option you have. Get a formal quotation from at least two contractors.
Remember, lower price doesn’t always mean it’s the better offer. Carefully review and compare each quote. Necessary permits (most localities will require this) can be included in your contractor’s contract. Be sure to ask and discuss with them every detail.
- Get Your Home Inspected
There are different inspection requirements for each locality. Be sure to ask and know what they are. Older structures are always required to be inspected for the following environmental concerns;
- Lead paint
- Asbestos
- Rotted wood
- Mold
- Other hazardous materials
If your home contains lead paint or asbestos, your municipality will require proper procedures for removal and disposal that should be strictly followed.
- Get Necessary Permits
This can be included in your contractor’s contract. Be sure to clarify this with them and establish who will be responsible for procuring this. Permits cover different aspects for every locality. Some have regulations for the following:
-
- Notifications
- Demolition hours
- Disposal of the debris
- Noise
Be sure your contractor is knowledgeable with all regulations. If you see they aren’t, talk to another contractor.
- Disconnect Existing Services
Keep the demolition site safe. Make sure that all your utilities (water, electricity, gas, sewage) are disconnected as they may pose health hazards during demolition and may involve neighboring houses in these hazards as well. submit disconnection requests ahead of time and account for processing times for each.
- Enforce Proper Safety Precautions
Demolition can be a hazard not only to you and your contractor, but as well as to your neighbors and passersby. Make sure your contractor practices full safety precautions by putting up temporary perimeter fences and safety nets.
For your part, go out and talk with your neighbors beforehand. Let them know of the demolition that will transpire and ask for their patience and consideration. They’ll respond better rather than waiting for them to complain.
- Salvage Materials
Consider reselling or donating any salvageable materials you can get prior to demolition. There are numerous charities or organizations that may be interested. What’s good about this is that they will assist in the deconstruction of your home for free. Coordinate with your contractor, they may be able to help you to look for organizations that may be interested.
This saves you both time and money as it can be a tax write off and saves you in demolition costs.
- Bring the House Down
This is where the heavy lifting happens. Your house gets torn down whether with heavy equipment or piece by piece. This can last up to several days depending on the method and amount of work.
- Gather and Dispose of All the Debris
Don’t make a mess. Properly gather all debris once the demolition is done. Then have all of it properly disposed of by your contractor or get a disposal service yourself. Never leave anything behind you don’t intend to reuse.
- Look Ahead to the Future
If you are planning to build something, a new home perhaps on the same site, use your demolition contractor for your excavation or grading. This will save you some money as they will use the same equipment they used in demolishing your house.
There you have it. Now you can confidently take on the task of demolishing your house. One last tip for you, be sure to always ask. Asking around lets you learn things and keeps you up to speed during the demolition process. Call us if you have any questions.